
After completing the audit work, I discovered many out-of-bounds vulnerabilities and our vulnerability verification shows that the vulnerable program has no lack of data encryption. Initially, I handle it in the usual way: figure out the entire encryption process and write a Burp plug-in or mitm proxy script for data encryption and decryption.
However, after a whole day’s analysis of the encryption algorithm, I found that it wasn’t as easy as I had thought.
-
Background
At the beginning of this year, the author received a bank code audit project, which included part of Android and iOS client code (excluding the encapsulation package) of three systems developed by a Beijing vendor and Erlang code of the background system. Erlang, as the intermediate platform to communicate with the core system of the bank, acts as the role of data forwarding. After completing the audit work, I discovered many out-of-bounds vulnerabilities and our vulnerability verification shows that the vulnerable program has no lack of data encryption. Initially, I handle it in the usual way: figure out the entire encryption process and write a Burp plug-in or mitm proxy script for data encryption and decryption.
However, after a whole day’s analysis of the encryption algorithm, I found that it wasn’t as easy as I had thought.
(1) The encryption algorithm itself, namely AES_CBC_128, is not complicated, but the algorithm to generate the key and IV is very sophisticated.
(2) The key and IV value are updated about every 10 minutes, and RSA is used for encryption during the update process.
(3) The encryption logic is encapsulated in the third-party library, with code obfuscated. This secures the complicated algorithm logic, making it difficult to crack it.
(4) Don’t spend too much time analyzing and reproducing the logic and writing plug-ins. Instead, I treat like this: handling data in plaintext before encryption and decryption and displaying data after decryption.
-
LUA & Data Sending
Generally, Android-supported executables include ARM programs, third-party libraries, and files in the DEX format. However, APK programs have a large number of Lua script files for interaction, they cannot be interpreted by the Android system and can only be interpreted by the third-party library used by the current program.
From the libluajava.so file, we can use IDA Pro to locate the following function
GetMethodId(env, claz, “postAsynâ€, “(Lcom/xxxxxx/emp/lua/java/CLEntity;Ljava/lang/String;Ljava/lang/String;III)Vâ€)

Figure 1 Locate the Function
Conducting a global search in jeb, we can easily locate Java function.
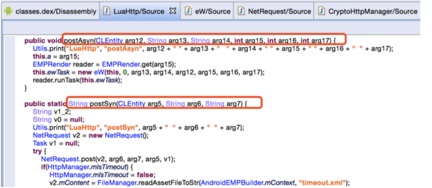
Figure 2 Locating the Java Function
EW is a task, and doRun is the key point.
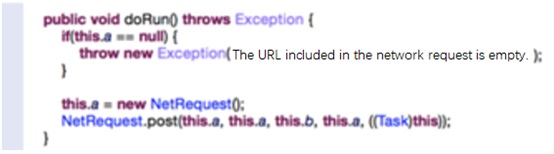
Figure 3 Key point for program running
The post method in NetRequest invoked the sendPostRequest method, as shown in the following figure:
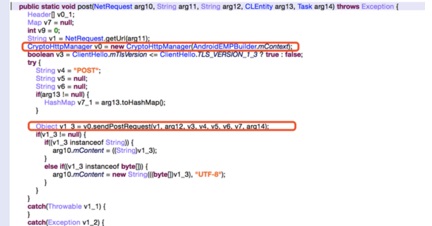
Figure 4 Calling SendPostRequest
Since CryptoHttpManager inherits HttpManager, it includes the sendPostRequest method.
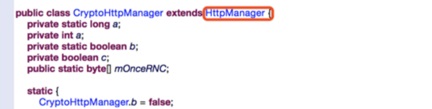
Figure 5 HttpManager
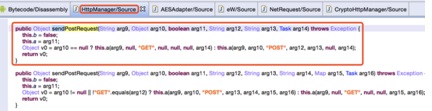
Figure 6 SendPostRequest
This.a first calls CryptoHttpManager which calls the a method of HttpManager to decrypts the returned content by AES, That is to say, the returned content is likely encrypted using the AES encryption algorithm.
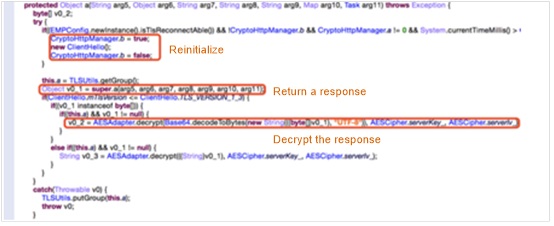
Figure 7 AES decryption
First invoke the parent class, encrypt data with the method in the child class and perform the Post action. After getting a response, use the “a” method of the subclass to decrypt it.
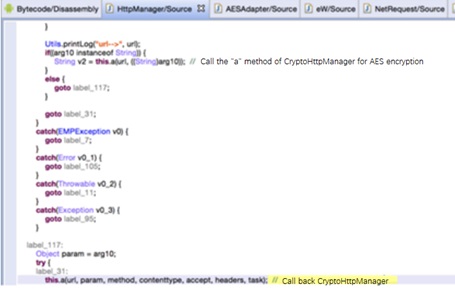
Figure 8 Encryption and decryption process
-
Hooking and Modification
Hook the “a” method (method to start requesting) of CryptoHttpManager and the decryption method (byte [], byte [], byte []) of AESAdapter (decryption method).
| 1
2 3 4 5 6 |
     var cryptoHttpMgr = Java.use(“com.xxxxxx.emp.net.CryptoHttpManager”);
var request_method = cryptoHttpMgr.a.overload(‘java.lang.String’,’java.lang.Object’,’java.lang.String’,’java.lang.String’,’java.lang.String’,’java.util.Map’,’com.xxxxxx.emp.render.EMPThreadPool$Task’); var aesAdaptor = Java.use(“com.xxxxxx.emp.security.adapter.AESAdapter”); var decryptByte = aesAdaptor.decrypt.overload(‘[B’, ‘[B’, ‘[B’); |
To print data, we need to use JavaScript to send data out:
| 1
2 3 4 5 6 7 8 9 10 11 12 13 14 15 16 17 18 19 20 21 22 23 |
request_method.implementation = function(url, param, rsq_method, contenttype,
accept, headermap, task){ send(“[+] Requesting …. “);
send(“- Req Method: ” + rsq_method); send(“- Req URL: ” + url); send(“- Req Params: ” + param.toString());
return request_method.call(this, url, param, rsq_method, contenttype, accept, headermap, task); };
decryptByte.implementation = function(content, key, iv){ send(“[+] Decrypting …. “);
send(“- AES key:\\n” + hexdump(b2s(key))); send(“- AES IV:\\n” + hexdump(b2s(iv)));
var result = decryptByte.call(this, content, key, iv);
send(“- out:\\n” + hexdump(b2s(result)));
return result; }; |
Frida receives and prints the data sent by the “send” function:
| 1
2 3 |
def on_message(message, data):
if message[‘type’] == ‘send’: print message[‘payload’] |
Format the output:
| 1
2 3 4 5 6 7 8 9 10 11 12 13 14 15 16 17 18 19 20 21 22 23 24 25 26 27 28 29 30 31 |
function hexdump(buffer, blockSize) {
blockSize = blockSize || 16; var lines = []; var hex = “0123456789ABCDEF”; for (var b = 0; b < buffer.length; b += blockSize) { var block = buffer.slice(b, Math.min(b + blockSize, buffer.length)); var addr = (“0000″ + b.toString(16)).slice(-4); var codes = block.split(”).map(function(ch) { var code = ch.charCodeAt(0); return ” ” + hex[(0xF0 & code) >> 4] + hex[0x0F & code]; }).join(“”); codes += “Â Â “.repeat(blockSize – block.length); var chars = block.replace(/[^\x20-\x7E]/g, ‘.’); // nonprinting characters if (chars.charAt(chars.length – 1) == ‘\\’){Â Â Â Â Â Â Â Â Â Â Â Â chars += ‘\\’; } chars += ” “.repeat(blockSize – block.length); lines.push(addr + ” ” + codes + “Â Â ” + chars); } return lines.join(“\\n”); } function b2s(array) { var result = “”; for (var i = 0; i < array.length; i++) { result += String.fromCharCode(modulus(array[i], 256)); } return result; } function modulus(x, n) { return ((x % n) + n) % n; } |
The final output is shown in Figure 9.
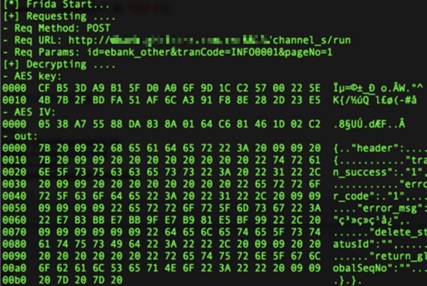
Figure 9 Logs to be printed
Burpsuite is needed if we wants to tamper with data packets. We can do it like the following:
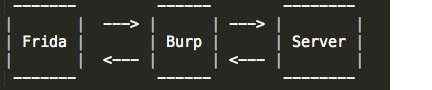
Figure 10 Packet tampering process
However, we cannot send the tampered packet to a real server, but just need a simple server requesting data return.
| 1
2 3 4 5 6 7 8 9 10 11 12 13 14 15 16 17 18 19 20 21 22 23 24 25 26 27 |
from BaseHTTPServer import HTTPServer, BaseHTTPRequestHandler
from optparse import OptionParser
ECHO_PORT = 2205
class RequestHandler(BaseHTTPRequestHandler):
def do_POST(self): request_path = self.path
request_headers = self.headers content_length = request_headers.getheaders(‘content-length’) length = int(content_length[0]) if content_length else 0
self.send_response(200) self.end_headers()
self.wfile.write(self.rfile.read(length))
def main(): print(‘Listening on localhost:%d’ % ECHO_PORT) server = HTTPServer((”, ECHO_PORT), RequestHandler) server.serve_forever()
if __name__ == “__main__”: print(“[x] Starting echo server on port %d” % ECHO_PORT) main() |
If the data can be printed out, the data has reached the Python layer and can be sent by the requests library.
As for the received data, the server only processes the specific data contents, instead of other requests. Thus, we can set the following restrictions on requests:
- Request feature – id=
- Request length – must be greater than 14
- Transmission flag – Req Params
Then use “post” in the framework to return content:
| 1
2 3 4 5 6 7 8 9 10 11 |
def on_message(message, data):
if message[‘type’] == ‘send’: print(message[‘payload’]) payload = ” if len(message[‘payload’]) > 14 and ‘id=’ in message[‘payload’] and ‘Req Params’ in message[‘payload’]: payload = message[‘payload’][14:] r = requests.post(“http://” + BURP_HOST + “:” + str(BURP_PORT), data = payload, proxies = proxies); if r.status_code == 200: script.post({“type”: “modify”, “payload”: r.text}) else: print(message) |
At the same time, obtain the returned data synchronously (not asynchronously):
| 1
2 3 4 5 |
      var op = recv(‘modify’, function onMessage(modMessage) {
send(“- Fix Params: ” + modMessage[‘payload’]); param = modMessage[‘payload’]; }); op.wait(); |
The decrypted content is also tampered in the same way, namely changing the value before returning data.
-
Repeating
In most cases, packet replay is also needed. Fortunately, the key can be used more than once. The user can easily realize data packet repeating by using tag:
(1) Send a Burp request.
(2) Wait for a response.
- If the response contains ASD (just a meaningless example), go to (3).
- If the response does not contain ASD, then break the loop and call the program method (one more call for breaking the loop).
(3) Remove the ASD tag.
(4) Call the program method.
(5) Add the asd tag and then back to (1).
| 1
2 3 4 5 6 7 8 9 10 11 12 13 14 15 |
while(1){
send(“[*] Repeating …. “); send(“- Req params: ” + param); // 1 var op = recv(‘mod_req’, function onMessage(modMessage) { //2 send(“- Fix Params: ” + modMessage[‘payload’]); param = modMessage[‘payload’]; }); op.wait();
if (param.indexOf(‘asd’) < 0) break; // 2.2 //2.1 param = param.replace(/asd/,””); // 3 request_method.call(this, url, param, rsq_method, contenttype, accept, headermap, task); // 4 param = param + ‘asd’; // 5 } |
The information processing code in python is as follows:
| 1
2 3 4 5 6 7 8 9 10 11 12 13 14 |
def on_message(message, data):
global theflag global vericode if message[‘type’] == ‘send’: print(message[‘payload’].decode(‘utf-8’)) payload = ” typestr = ‘mod_req’ if len(message[‘payload’]) > 14 and ‘Req params:’ in message[‘payload’] and ‘id=’ in message[‘payload’]: payload = message[‘payload’][14:] r = requests.post(“http://” + BURP_HOST + “:” + str(BURP_PORT), data = payload, proxies = proxies); if r.status_code == 200: script.post({“type”: typestr, “payload”: r.text}) else: print(message) |
This is also another approach. It should be noted that the returned data is only one of parameters in the function and other parameters needs to be initialized or global variables needs to be set in this function.
(1) Use SimpleHTTPServer to monitor a port that is used to receive requests from Burp.
(2) Use asynchronous messaging to receive messages that are posted (data obtained from the listening port).
(3) Call functions after receiving data.
-
Verification
Start the server and Burpsuite and run the program. The plaintext data will be modified when it arrives at Burpsuite. After reaching the program, the data will be replaced before being encrypted. In the wake of that, different results will be shown on the interface.
-
Summary
After the plaintext data is modified before hook-based encryption, the program be used for tests on Android and iOS systems of some banks, as well as tests on PCs.
In general, the advantage of this approach is that there is no need to care about whether the certificate supports one-way or two-way authentication, whether the modification times out, or whether data irrelevant with business is generated or not.
The encoding issue is a defect of this approach, which is difficult to solve. Due to a large number of Chinese characters exists in the returned packet, the packet, once being modified, cannot be used. Furthermore, the tool runs so slowly that it will be struck once too much data is processed or in the case of key exchange.